Statement of the Heart

"To love what we do and share what we love,as we help others enjoy creativity and worthwhile accomplishments... in this we make a difference!"

Sunday 28 March 2010

Delys Cram

Has kindly offered to be our 2nd tutorial writer and share a little bit about herself. She's created these cool pansies using the butterfly punch which is about to disappear on March 31st, as they're in the current Summer Mini catalogue & we won't be able to order from it after this date!

Delys's story - after coming home on holiday from overseas in 2001, my hubby Dave, our two kids Rhys (16), Jennifer (13) and I decided to stay in NZ and we went dairy farming. This was a huge change of career as I was formerly a medical scientist and Dave was a Boarding School Manager.

I had already dabbled in embroidery and patchwork but working on a farm put that hobby in the too hard tray so I gave scrapbooking a go and taught myself for a year or two before going to formal classes. It’s now a lifelong hobby for me.

Over the years, I’ve been lucky enough to have won competitions here and overseas, being published many times both here and overseas and being on design teams both here and in Australia. Last year I had the pleasure of being on the Up2scrap Elite Team (which is NZs only paper craft magazine).

In May 2008 I saw an advertisement in a magazine about Stampin’ Up! ..And I knew right then I had to join. Never having done much card making, it has been a fun journey of discovery and being in a supportive and wonderful team environment.

Having a team myself has been most rewarding but as I don’t tend to follow rules successfully I have named my team Del INK quents... all of my team love the name to bits!

Just recently I have joined the Just Add Ink Team and love the challenges and the inspiration the other DT members give me. I love seeing everyone's submissions / projectS every week which then inspires me onwards.

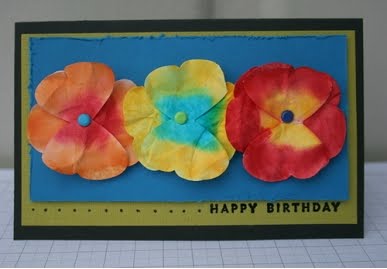
Making pansies – Delys Cram

My tutorial is using that fabulous Butterfly punch (116629) that is about to be unavailable come April 1 and so this tutorial is also a reminder to get your order in to your demonstrator quick smart so you too can make pansies.

Materials needed: 
  • Butterfly punch 
  • Stampin rite markers
  • Whisper White cardstock
  • Water spray bottle
  • Brads

1.    Punch 2 butterflies out of Whisper white cardstock. .
2.    Colour in the butterflies with two colours. You can see in these photos I’m not being overly fussy about the colouring in here.  
3.    Spritz with a water spray bottle or alcohol spray and let the colours run a little.  
4.    Let dry. I used a heat gun to speed up the process.
5.    When dry screw up the butterflies and unfold again. 
6.    Arrange one landscape and one portrait over the top.
7.    Pierce a hole and put a brad into the centre. 
8.    Finish your card. I’ve made a few different colours but you are only limited by your imagination what colours to use.

If you'd like to download the tutorial & print it out please click HERE.

Thanks for sharing this Delys - I love the butterfly punch so this makes it an even better investment.

Anyone else wanting to share with us a cool technique & a wee tete-a-tete please do contact me.

Tuesday 23 March 2010

Project Tuesday

 Congratulations Sarah Gough she's on the design team of Project Tuesday this week's challenge is to make a flower pot card - you can click HERE to download a template from the very talented Andrea Walford.

So let's join Sarah at Project Tuesday & also link below with Mr Linky so we can all see what we've KReated. I must admit Sarah has used my first SU! stamp set which has retired & I sold mine this year (regretfully looking at her awesome card).

We'll have close of here next Tuesday night at 9pm - so hope this inspires you to have a go - I'm sure our mum's would love this for mother's day!

Thursday 11 March 2010

Keryn Campbell: our first NZSU tutorial

Many thanks to  Keryn Campbell for putting her hand up & being our FIRST guest designer.

Now I asked Keryn to share with us all a bit about herself as well as provide the tutorial & here's her reply:

Partner of Dave, mum to Lachlan (9) and Cameron (6); and lucky her she works from home doing something she loves. Born in Tawa, Wellington and after living away in other places has been back in Tawa for the last eight years.

Keryn started cardmaking approximately 12 years ago at a Krafty Kids party where she saw heat embossing being demonstrated. She signed up as a demonstrator in July 2007.  She still loves doing workshops and classes, both for the creative and the social side of being a demonstrator.  One of the best parts of it is Keryn's Krew (her team) which have allowed her to build some fantastic social and business relationships with the members.

She's been a member of the Daring Cardmakers design team since it started in October 2006 as the first card dare blog.  The Daring Cardmakers Blog has no company or product affiliations so we have complete freedom to use whatever product we like to complete the dares.

When she has a free moment she is relearning to play her clarinet after neglecting it horribly since leaving college and is a member of the Tawa based Aspire Music Performance Academy mostly playing Swing Jazz as part of it's development band.

Without further ado Keryn shares with us all how to create a faux bow using the jumbo grommets:
The tutorial uses the jumbo grommets found in the current Stampin’ Up!® Summer Mini Catalogue available only until 31 March 2010.

She personally find bows incredibly difficult to tie nicely (tell me about it!).  This technique gives the look of a bow without having to actually tie one.

The trick to getting away with not tying an actual bow is to have another decorative way of holding the ribbon together.  She's used Jumbo Grommets but comments you could use designer brads or any other embellishment that will get the job done.

Step 1: - Cut ribbon to a length slightly longer than double the size of your finished bow.  I want my bow to be approx 5cms long so have cut my ribbon at 12cms.  Make sure the ribbon chosen is slightly wider than the diameter of your chosen embellishment. She's used chocolate chip 1” double stitched grosgrain ribbon.

Step 2: - Stick ends of the bow together to form a loop.  I just used my Snail Tape Runner and placed one end over the other.  It only needs to hold into the grommet is attached.  I wouldn’t use sellotape as it would be another layer to have to force the brad through.


Step 3 – Gently push the prongs on the brad through the centre of the ribbon loop.


Step 4 – Use the side of a bone folder flatten the prongs.

Step 5 – to use my embellishment on a card I have cut a square of Windsor Knot Designer Series Paper and stuck the ends of my strip of ribbon to the back of paper.

Step 6 – Position your faux bow over the ribbon using Sticky Strip or other strong adhesive.

Step 7 – I finished my card by mounting my embellished DSP on a layer of Chocolate Chip cardstock and on to a Sage Shadow card base.  Your can use any greeting to finish it off.  I’ve chosen to use initials using the Big Deal Stamp Set and Chocolate Chip Classic Ink.

What a great start so if you'd like to download a copy of Keryn's tutorial click HERE

If you'd like to be our 2nd guest designer do contact me I'd love to hear from you and if you'd like to have a go at making Keryn's bows & sharing with us all  please link your creation with Mr Linky below (ALL welcome). Closing time 9pm next Thursday 18th March - until then happy stampin'


Tuesday 2 March 2010

Paula's Impossible Box

Paula has created her tutorial & blogged it & it's fabulous so do check it out & I'm sure if you ask her nicely she'll send you the instructions in a PDF file. Click HERE to see what I mean.

So our challenge this week will be to have a go & link your creations below with Mr Linky which will close at 8pm Tuesday 9th March


So I'm still looking for someone to write a tutorial for NZSU exclusively plus tell us all a bit about yourselves - don't be shy or it'll have to be me!